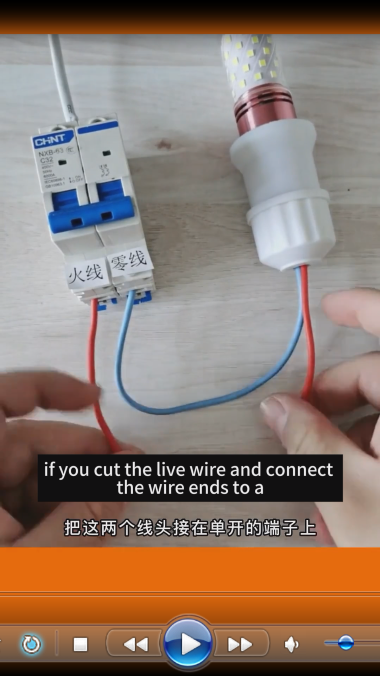
Wiring Methods for Single-Control, Double-Control, and Three-Control Lights
 Detailed instructions on the wiring methods for single-control, double-control, and three-control lights, including required materials, wiring principles, and operation steps:
*1. Single-Control Light Wiring Method**
**Application Scenario**: One switch controls one light (e.g., bedrooms, small rooms).
**Required Materials**: 1 single-control switch, power cables (live wire L, neutral wire N), lamp holder, light bulb.
*Wiring Principle**
The single-control switch only needs to control the on/off of the live wire, while the neutral wire is directly connected to the lamp holder.
*(Schematic diagram: Live wire → Switch → Lamp holder, Neutral wire → Lamp holder)*
*Operation Steps**
1. **Power Off**: Turn off the main power supply and use a voltage tester to confirm no electricity in the circuit.
2. **Connect the Switch**:
- Connect the live wire (red or brown) to the "L" terminal of the single-control switch.
- Run a wire from the "L1" terminal of the switch to the live wire interface of the lamp holder (usually labeled "L").
3. **Connect the Neutral Wire**: Directly connect the neutral wire (blue or black) to the neutral wire interface of the lamp holder (labeled "N").
4. **Install the Light Bulb and Test Power**: Ensure all connections are secure, install the bulb, restore power, and test if the switch controls the light normally.
*2. Double-Control Light Wiring Method**
**Application Scenario**: Two switches control the same light (e.g., stairwells, bedroom doors and headboards).
**Required Materials**: 2 double-control switches (each with three terminals: L, L1, L2), power cables, lamp holder, light bulb, 2 control wires (to connect the two switches).
*Wiring Principle**
The two double-control switches are interconnected via two control wires to jointly control the on/off of the live wire.
*(Schematic diagram: Live wire → L of Switch 1 → L1/L2 of Switch 1 → Control wires → L2/L1 of Switch 2 → L of Switch 2 → Lamp holder, Neutral wire directly connected to lamp holder)*
*Operation Steps**
1. **Power Off and Prepare Circuits**:
- Determine the installation positions of the two switches and lay power cables and two control wires (it is recommended to use different colors, such as yellow and green, for distinction).
2. **Connect the First Switch (Switch 1)**:
- Connect the live wire to the "L" terminal of Switch 1.
- Connect the "L1" and "L2" terminals of Switch 1 to one end of the two control wires, respectively.
3. **Connect the Second Switch (Switch 2)**:
- Connect the other ends of the two control wires to the "L1" and "L2" terminals of Switch 2, respectively.
- Run a wire from the "L" terminal of Switch 2 to the live wire interface of the lamp holder.
4. **Connect the Neutral Wire and Lamp Holder**: Directly connect the neutral wire to the "N" terminal of the lamp holder.
5. **Test Power**: Ensure both switches can independently turn the light on and off.
*3. Three-Control Light Wiring Method**
**Application Scenario**: Three switches control the same light (e.g., corridors in large apartments, rooms with multiple entrances).
**Required Materials**: 2 double-control switches, 1 intermediate switch (or three-control switch), power cables, lamp holder, light bulb, 3 control wires.
*Wiring Principle**
An intermediate switch is added to the double-control setup to achieve three-location control by changing the connection mode of the control wires.
*(Schematic diagram: Live wire → Switch 1 → Control wires → Intermediate switch → Control wires → Switch 2 → Lamp holder, Neutral wire directly connected to lamp holder)*
*Operation Steps**
1. **Power Off and Plan Circuits**:
- Determine the positions of the three switches and lay power cables and three control wires (it is recommended to use colors A, B, and C for distinction).
2. **Connect the First Double-Control Switch (Switch 1)**:
- Connect the live wire to the "L" terminal of Switch 1.
- Connect the "L1" and "L2" terminals of Switch 1 to one end of control wires A and B, respectively.
3. **Connect the Intermediate Switch**:
- The intermediate switch has 4 terminals (e.g., L1, L2, L3, L4) and is connected as follows:
- The other end of control wire A connects to L1 of the intermediate switch, and the other end of control wire B connects to L2 of the intermediate switch.
- Run control wires C and D from L3 and L4 of the intermediate switch to the second double-control switch.
4. **Connect the Second Double-Control Switch (Switch 2)**:
- Connect control wires C and D to the "L1" and "L2" terminals of Switch 2, respectively.
- Run a wire from the "L" terminal of Switch 2 to the live wire interface of the lamp holder.
5. **Connect the Neutral Wire and Lamp Holder**: Directly connect the neutral wire to the "N" terminal of the lamp holder.
6. **Test Power**: Ensure all three switches can independently control the light.
*Precautions**
1. **Safety First**: Always operate with the power off to avoid electric shock; it is recommended to have complex wiring (such as three-control) done by a professional electrician.
2. **Wire Color Coding**: Use different colors to distinguish live wires (L), neutral wires (N), and control wires for easy fault troubleshooting.
3. **Switch Types**: Double-control switches cannot be replaced with single-control switches, and intermediate switches must be used in conjunction with double-control switches.
4. **Load Matching**: Ensure the rated current of the switches is greater than the total power of the light fixtures to avoid overheating from overload.


